Tuesday, June 28, 2011

Get That Monkey Off My Back!

Did you ever feel that way?  You've started something and then it just seems to linger and haunt you?  That's kind of how I feel about this project I've been working on.  Guess what!  I finished the necklace part!!!!  Finally.  whew.  I also finished the pendant.  I need to bead the bail for the pendant next, but that shouldn't take too terribly long.  And then I need to get a clasp for the necklace.  I was soooo bummed out when I finished it and realized I didn't have a clasp.  I know I bought two just last week, but I have no idea what happened to them.  Maybe they're around somewhere.  Or maybe I used them and just don't remember.  *sigh*

MY CAR NOW HAS A/C!!!!!  For those of you who don't know, I live in the stifling heat in the Valley of the Sun, Scottsdale, Arizona.  Temps the last couple of days have been about 115F.  It's an unbearable heat.  You walk outside and you instantly feel dehydrated like a raisin.  Your eyeballs dry out.  Your mouth is parched.  And what fluids you do have in your body are now sweating out of you.  And inside the car is even hotter than outside.  I've been without A/C in my car for about 2 years now.  It's been miserable for 6 months out of the year.  I could only bear to drive late at night when the sun has been down for hours (even now at 11:30 p.m. it is still 99 degrees outside!) and have the windows open, whipping that hot air right back in my face.  But that hot air is still better than the stagnant, suffocating heat inside the car.  It cost us a lot of money, but my husband FINALLY said we could get it fixed!!!!  That's the highlight of my week.  That, and finishing that dang necklace.

Sorry I don't have any pics of anything to show you right now.  I have been working on a few things, but there might be some exciting things coming up in my future.  I will let you know more when I am able to divulge secrets.  What are you all working on?

I hope all of you are having a good week.  And I just want to say HELLO! to my new followers.  Thank you for joining me!  Feel free to jump in with comments at any time!

Tuesday, June 21, 2011

More Right Angle Weave

I think all of the RAW I have worked on has been squares made up of multiple beads per side, like 2 or 3 per side so 8 or 12 per circle (or square...whatever).  This morning I woke up at 2:00 and started looking for something to do.  I decided to do a RAW bracelet that uses just 4 beads per square, and man was it ever easy compared to learning with 8 or 12!  Plus it was just one row.  So easy.  I looked through my stash and found some 8mm dark blue cat's eyes, and some 4mm (I think) in two different shades of blue.  I didn't know if I would have enough of either one, so I decided to alternate them.  Then I looked for just the right beads to make the embellishment around it.  I dug up some 11/0 cobalt blue Toho's.  I just looooove these colors!!!!!

I finished it pretty quickly and I wish I had more of the right sized beads in other colors to make more and some more clasps to finish them off.  I really like how this one looks.  I found a video on how to make it here, and I just added embellishment to both sides.  I like the spiral going down both sides.  You can't tell from the pics, but it looks neat.  I guess you can say that embellishing both sides is a waste since one side will be against the wrist, but that's ok.  I like it.

Here are some pics of what I made.  Aren't the colors so pretty!?


And on non-beading things, I'm really proud of my daughter, Sara.  She certainly has a greener thumb than I do!  She is growing tomato plants.  They sprouted and we just transplanted them to bigger pots the other day.  Every morning she gets up to go check on them and to give them some water.  She also said no one is allowed to go out and say anything mean to them...we all have to be nice to her plants.  I thought that was kind of cute.  Like any of us would go insult her plants to begin with, but it's funny how she figures they have feelings too and won't grow as good if they're not happy.  Here are some pics of her little children, as I call them.


Hope everyone is having a happy week.

Sunday, June 19, 2011

Practicing RAW

I know you're never going to believe this...I started something else instead of doing my current project!  lol  Or maybe you would believe it.  But I did a whole inch last night on it!  Boy, is it tedious.  I got bored quickly and so diverted my attention elsewhere.  I did try to stay with the project by beading a pendant to go with it.  Didn't work out too well.  Ripped it apart.

Here's what I did instead...little RAW bracelets I found in Bead & Button by Abby Cobb.  It's just an easy and quick bracelet, and so I made two! :)  I am definitely getting better at RAW and it's not quite as scary as it once was.  Don't get me wrong...it's still scary.  I'm going to stick with simple RAW for now.  I'll work my way up eventually.  Here are pics of my two bracelets.  I did one last night and one today.

It's kind of a raspberry pink base with metallic rosey/coppery something or others on the top.  I did the same bracelet but on the 2nd one I used cobalt blue (one of my very favoritest colors of all) and silver.  I did the embellishment a tad different on the 2nd one.  In the first one the little stacks on top are all one color.  In the 2nd one, I made the center of the stack blue so to me they look like little silver flowers on top.

There you have it...that's what's been keeping me busy.  We are having a very uneventful Father's Day.  My hubby is being very bah-humbug about the whole thing and says it's "just another day".  grump butt.  Hope you all are having a great weekend.

Friday, June 17, 2011

new bracelet done tonight

No, not THIS kind of ladder.  I did a bracelet based on a pattern by Silvana Terry...it's a free project with Bead & Button.  It's called Bugle Clusters and is based on the ladder stitch.  I must admit that I am NOT very good at reading instructions or illustrations.  I do so much better with videos.  But tonight all I had was the written instructions.  I used seed beads in two different colors each of 6/0 and 11/0 and then 6mm bugles. 

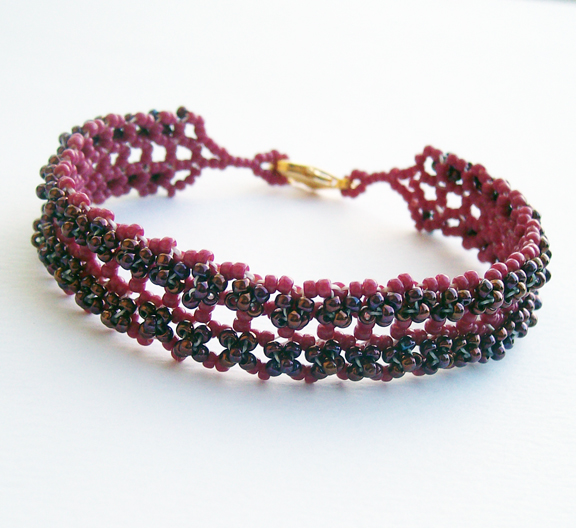
If I understood the directions correctly I was to make 2 separate ladder stitched lines, 2 beads tall and divisible by 3.  I went with 42 stacks.  Then it's just a matter of stringing in the middles and stitching the top and bottom onto the middle in the process.  In the picture there are the 3 bead picots on the top and bottom edges that goes across 2 and skips a space.  In the skipped space I decided to go back and add the same 6/0 I used in the middle of the bugle clusters. 

I first ran into trouble when I was trying to figure out the clasp.  She did a toggle using a headpin.  Hmmm.  Ok.  So I went searching for my 2" headpins as the directions say and got out my wire tools.  If I strung the beads in the pattern she said, it wouldn't have fit on my headpin, even though I used a 2" headpin just like she said.  So I adjusted it to a shorter pattern and made my little toggle.  Then to attach it, it said to put the needle/thread through the middle 6/0 seed bead on the wire and go around through it a couple times.  NOT!!!  The needle does NOT fit through there.  I don't know what gauge of wire she used, but mine was definitely too thick.  And if I used a much smaller wire so that it would fit, the wire would be so easy to bend I don't see how it would be functional.  So I scrapped the wire toggle and went with a simple beaded loop and lobster claw clasp.

My next problem was trying to understand how to embellish the center of the bracelet.  I simply could not figure it out.  I tried so many times, and it just looked like a heap of a mess every time.  I decided not to embellish.  Then once I was all done, my bracelet with the clasp was MUCH too long.  I let out a heavy sigh and started ripping it apart.  I managed to salvage the ladder stitched top and bottom so at least I didn't have to do that over again.  And I was able to save a few pieces of usable Fireline.  I only had a tiny bit left on the spool and I was afraid of running out.  Then I put the whole thing together again.  This time I didn't add the last single line of bugles on the ends and did the clasp instead from the middle of the last cluster on each side.  When I was done, it measured just at 7 1/2", so I was much happier with that.  Yes, I know that will still be too big for the thin women out there, but I think 7 1/2" is an average size that fits a lot of people.  I can always make another one smaller if anyone ever decided they wanted one from me, right?

Even though it's not embellished, I still think it's pretty.  The 6/0 in the center of the clusters and along the outside edges is one of those that changes colors from purple to green to a little bit of gold depending on how the light hits them.  The other beads making the picot on the edge is my very favoritest (yes, that's a word in my book) purple seed beads.  They are a true, beautiful purple and I love them.  The bugles and other seed beads are greens, but not solid.  The colors have a slight variation to them that makes them very pretty.

Here is my Bugle Clusters bracelet that I did tonight.  And if you're keeping track, yes, I am still avoiding that other project that I can't seem to finish.  Obviously I'd have a better chance of finishing it if I stopped starting new things.


And wouldn't you know it...good thing I was able to save a few strands of that Fireline because between the reused thread and the little bit that was left on the spool, I had just enough.  Yea!

Tuesday, June 14, 2011

Got some beads to show

Happy Flag Day.  I thought this flag heart was appropriate and very cute and definitely says love of country.  I didn't sleep again last night, so I had plenty of time to work on beads, and I actually have something to show today.  Imagine that! 

I saw a photo of a rope I liked on greeniezona's Flickr page.  Normally I would put the link, but her Flickr page is also filled with personal photos of her family, and I don't know if it would be right for me to direct a lot of people there.  greeniezona....if it's ok to post your Flickr page, comment and let me know.  Anyhow, I asked her what stitch it was and she said she was inspired by another necklace on Etsy.  I set out to try to figure out how to do the stitch, and after a lot of searching and a lot of help from Mandy over at Beads for Brains: 365, I figured it out.  Then it took a lot of tries and some ripping, sorting and restarting before I got it right.  And mine still never looked quite like the one from greenie or the Etsy shop...their's kind of kinked up along with the twist.  mine just layed smooth and twisted. 

I used a bronze 8/0, and in 11/0's I used gold metallic, galvanized brown, cream and a transparent champagne color.  This stitch was very easy on my hands, and I know I will do this one again in some other color/size combinations.  I really like how it looks.  And I love the colors I chose.  I took some with the pendant and some without.  I wish I knew what the stone is in the pendant, but I don't.  If you do, let me know.  Who wants to play the name game?  Any suggestions?


It is 23 3/4" and is hooked with a gold plated lobster claw clasp.  This was the first time I had made and attached a beaded bail.  I wasn't sure of the "proper" way to do it, but my way seems to have worked just fine.  Oh, and the pendant is backed real nice with a tan micro suede.

Monday, June 13, 2011

Checking In

I have not posted for a bit, so I thought I'd better check in.  I have been busy beading, but the two projects I am working on have been taking forever to finish.  I am working on two necklaces.  One is peachy something or other, tangerine and brown...ick, right?  it really doesn't look bad.  I like it...it's different!  The other is bronze, gold, cream, transparent and brown with an embroidered cabochon pendant.  I'm not sure how to attach the cab.  I've never beaded a bail and attached one before, so I'm going to be winging it.  And I'm hoping the rope is sturdy enough to handle it because it looks really pretty together. 

I have to go buy some clasps for them also.  But it is getting hot here (low 100's) during the day, and the A/C in my car has been broken for quite some time.  So I don't drive during the day unless it's absolutely mandatory.  Then by the time evening rolls around, the sun has gone down and it's cooled down a bit, all I want to do is stay home.   I'm going to a Craft Night at a friend's house tomorrow evening, and I'm hoping to have at least one of these necklaces done in time to show. 

In between beading on my projects and stuff around the house, I have been busy playing with Studio J and making more scrapbook pages.  I've done quite a few, but I'm going to post just a couple for you to see a glimpse into my world.  The first page was 4th of July when we lived in Plattsmouth, Nebraska in 2006.  It was a tiny little town taken out of the pages of the books of days gone by, and they had a tremendous fireworks display down by the river.  Matthew was so scared of the fireworks.  But did you know that zombies love fireworks?  It's true.  They are attracted to the big booms.  And Matthew loves zombies.  So he played he was a zombie during some of the show to get through it all.  lol.  The pic of him with his head dropped while standing up is his zombie impersonation.  The first pic of Jeff and Sara is one of my all time favorites.  You can click for a larger view.

The 2nd one is of Sara.  We had a beauty day and I put a little bit of makeup on her, then she modeled and posed for the camera.  What a doll!  This was also in 2006.  The thing about this page is that Sara basically made the whole thing herself.  I uploaded the photos and did the clicking, but she made all the decisions on the paper, layout, embellishments, etc.  Didn't she do a great job?
She's so beautiful!!! :D  Sorry I don't have any beading to show you again.  I have been working on things and trying to get them done, but the two things I am working on are very time consuming.  So I hope you have enjoyed this little interim post and you now have a view into my little corner of the world.

Wednesday, June 8, 2011

Close to My Heart Online Scrapbooking

I discovered something really cool!  Online scrapbooking!  No tools to buy, paper and stickers and products to store...NO MESS!!!  I found it through my good friend Beth A. (click here to see more on her website), who is a Close to My Heart representative.  I've got a ton of photos on my computer, and last year when my desk top died I lost sooooo many photos and I was devastated.  This is going to be a fantastic way for me to get my photos into books.  All you do is upload your photos (everything is taken through for you step by step), choose a paper pack of already coordinated papers (there's a ton), choose a layout, and then start making your pages.  It's so easy because it's all drag and drop and click here and there to change colors, embellishments like ribbons, brads, hinges, buttons, etc, stickers and tags, edit text blocks and titles...voila!  You have professional looking scrapbook pages. 

This month they are giving away a free jpg file which includes 2 high resolution files of each page for you to print on your own, and one low resolution file that you can share on the net.  All you have to do is create an account and start playing.  Give it a try!  It's a lot of fun to see everything come together.  And what else is nice is that you can change paper colors and patterns with just a click, and if you don't like it you can undo it.  Unlike real scrapbooking where you have to cut up lots of paper, decide you don't like this or that, and then you've wasted stuff.  No glue.  No tape.  No paper scraps.  No crooked cropping.  Here are the two pages I made first.  Now, I did this when I didn't know to click on the different pull downs to access different embellishments and things, so it is just a little plain, but I love it and Matthew loves it (he picked out the paper pack).  Except I realized after I did it that I made a typo.  Figures, huh?  Here's my layout of Matthew's 11th birthday this year.  You can click on it for a larger view.
You can order prints of the 12x12 pages and have them mailed to you also.  That's what I'm trying to talk hubby into letting me do.  I really want to get caught up on my scrapbooking and this makes that task fun and so much less daunting.  I've made 2 more layouts, but I can't show you those since I don't have jpg's of them.  If Jeff let's me order some then I will show those to you also.  I'm getting better with a little practice.

So if you would like to learn more about Studio J, contact Beth A. here through her website. 

Monday, June 6, 2011

Gifts From My Children

I wanted to post pics of the beautiful gifts my kids made me for Mother's Day this year.  I know.  I'm a little slow and Mother's Day seems like ages ago already, but I've had a rough week and am just now getting around to it.  First, Matthew (11, 5th grade) made me a most beautiful little woven tapestry.  I was very impressed with it because he made it nice and even throughout.  I remember doing these when I was in grade school, and it was difficult to keep the tension right and they would usually cinch in through the middle.  It can happen that way when looming too.  But Matthew did a wonderful job!  I'm going to put it in a frame and hang it for everyone to see.  Thank you, Precious!


Sara (9, 3rd grade) also did some weaving, but it was a little different.  I have never seen this idea before, and I thought it was a great idea.  It made a super gift!  They used cups for weaving.  They cut the cup from top to about 1/2" from the bottom all the way around to make the warp strips.  Then she weaved up the cup and made a terrific little vase that now sits on my table next to my computer.  She even added beads for her bead-addicted mama.  Thank you so much, Punkin!  Here is Sara's vase:

Also, Matthew was sooooo proud of himself for his state report, a very large project, that he wanted me to put it on my blog, too.  Matthew chose the state of Nebraska.  That's where his daddy comes from, and we lived there for a short time too.  Did you know that Kool-Aid was invented in Nebraska?  Did you know that the University of Nebraska leads the nation in the number of All Americans?  (65)  Did you know that there are approximately 40,000 farms in Nebraska?   Holy mackerel!  Anyways, he now knows tons of stuff about Nebraska.  He worked very hard on his project, and he is very proud of his work.  He's got pics of the state flower, tree and bird, a Nebraska football player (his favorite pic), some Kool-Aid, and a map in addition to his facts pages.  There is also a written report that goes with it.  Here's his display...

He's hoping for a great grade.  Matthew has made a deal with his Dad this year.  If he makes Principal's List (all A's or all A's and 1 B) all year, then he will get to buy Gears of War 3 for his X-Box 360 the day it comes out in September instead of having to wait until Christmas.  So far, Matthew has had straight A's all year.  It looks like he will reach his goal as this last quarter he is getting all A's and 1 B.  I'm so proud of him for all his hard work!

Ok, gang.  That's about all I have for today.  I am working hard on some new designs.  I finished a set this morning, but I am going to wait to post it until I have a similar set done with the beads I ordered earlier this week.  It is for my June BJP.  I'm very excited about it, and I think the set turned out beautiful.  It's shades of pink.  Love it!

Hope you are all having a fabulous week.

Calla Lilies (in beads)

I just love calla lilies.  They have always been one of my favorite flowers.  I don't know why, but I just love the shape and simplicity of them.  To me they are very elegant.  Some time last year I found the prettiest frosted calla lily beads.  I'm having a hard time now remembering though if they are glass or resin.  The writing on the plastic bag rubbed off, so now I don't even remember where I bought them.  I had been looking for quite a long time to find just the right beads to go with the calla lilies.

I had in my mind what I wanted to do with them, but I needed a green bead and a yellow bead that would fit the bill.  I came across the perfect green beads at Artbeads.com...on clearance nonetheless.  Of course, not knowing exactly how many I would need I bought 2 strands of these gorgeous, sleek olivine cat's eye rectangles.  Since they were on clearance I knew if I didn't order enough, I'd never find the same ones again.  Finding yellow beads is so very difficult.  If I did find the right color, they weren't the right size or I didn't like the shape.  Then one day I wasn't even looking for them and these little yellow and white nuggets caught my eye.  Perfect color, perfect shape!  How lucky am I?

I wanted my necklace to be a little abstract, but still get the feel of the calla lilies.  I strung the beads on flexible wire, which I have never used before, and crimped the ends around the clasp.  I like the wire!  I am definitely going to use it again.  Here are pics of my simple little (20") calla lily necklace.  Each of those flower beads is 1 1/2" long and 1/2" wide...pretty substantial!  And the flowers do match up and are centered...I just had the necklace skewed on the form.  dumb me!


As always, you can click to see a larger view.

Sunday, June 5, 2011

What Is It??? And What The Heck Do I Do With It???

Since my last post I had a terrible headache for two days and didn't do any beading at all.  Then I felt like I was just in a funk or had the doldrums.  I missed my bead therapy!!!  Needing to bead, I sat down and started working more on my current project that is taking forever.  I measure it every 30 minutes or so to see how far I've gotten, then I get bummed that I didn't get more done...because I just want this one to be over!!!  It's been on my table for what seems like an eternity.  But did I stick with it?  NO!!!  lol  I started something else.

A while back I did some clay cabochons if you remember, and I was looking forward to beading with them.  I ordered some beads from Artbeads.com to go with the pink and white cab that I made.  It's been sitting there for quite a long time.  Every now and again I would pull it out and wonder what the heck I was going to do with it.  Some of the beads were not the right shades of pink...one was too pale and the other was too hot.  And then I thought, "That sure is a whooooole lotta pink!"  Dang.  I just remembered my last post when many of you said you didn't like pink.  Now I'm going to be embarrassed to show this to you.

Ok, onward anyways because it's the only thing I have sort of done to show you.  I promise my next something or other won't be pink.

To try to counterbalance some of the pink I added a little green, and there is white to also soften it.  When I got to the outer edge I felt soooo dumb because I couldn't do a picot.  I thought, how basic is that and I can't figure it out???  So I stopped thinking about it and took a break.  Wouldn't you know it?  When I wasn't thinking about it a light bulb went off in my head and I could see in my mind how to do it.  Yea!  I'm not so dumb after all!!!  But I don't know.  It kind of looks like a cake.  Or the top view of a frilly hat.


I have no idea what to do with this.  (It's 3" x 2.75")  Put a pin back on it and call it a brooch?  Make a beaded bail, bead a rope and make a pendant on a necklace?  Or, put it in a drawer and call it practice, never to see the light of day again???  Well I can't do that.  That would be a waste.  Should I rip it apart and salvage the Swarovski's and other beads to be used another day?

I think I need to ponder this one for a while and go back to my boring project.  What do you all think?

Friday, June 3, 2011

Card Class Pics

A couple of you wanted to see pics of the cards Sara and I made on Wednesday.  The lighting wasn't the best.  The cards were supposed to be an assortment of sentiments, but I chose to make mine Thank You notes.  I will use those most often.  Sara was more creative with hers.  She had fun choosing the sayings and doing the stamps.  I'll show you mine (I left my insides blank), and then Sara's and how hers were different.

Father's Day Card
Sara's Mini Father's Day Card  (hers is only a few inches each way, whereas mine is a full size card.  You can tell the difference in the sizes by comparing the "Happy Father's Day" circles...they are the same size, but hers takes up a lot of her card.)  It's super cute.  The card closes by tucking up under the collar.  Inside is a square of paper to write your message on.
I messed up with my stamping on this one a little bit.  I put the curly q going too far in the middle of the strip, so there wasn't enough room for the heart stamp that was supposed to go on it.
Here is Sara's (done correctly).
Another one...
Sara's...
and the inside...isn't that such a cute little saying?
My peacock card.  It is silver embossed and then painted with a little fingertip dobber and a feather stamp.  It's really pretty.
Sara's peacock card and her inside saying.  She said she loves it too much to give it away.  This is her favorite.
And the last card.  I was getting real tired by this time and my brain was on overload, so I left off some elements and simplified mine.
Here is Sara's last card done correctly with the little pinwheels.  Very cute.
Didn't Sara do a great job?  She's very creative and artistically talented.  Thank you to Beth A. for a very fun afternoon!!!

Wednesday, June 1, 2011

Special Request for a Little Girl

Do you remember the cute little blue/peach/green flowery chain I did the other day?  It got snagged up yesterday.  A good friend of mine thought it would be a great present for her granddaughter.  She wanted one for the sister, too, but not exactly the same.  She thought maybe red flowers instead of blue and peach, but then I was concerned if the red and green would look to Christmasy.  My friend was saying how the girls are very different people and she likes to give them unique gifts.  She asked if maybe there was a similar stitch that wasn't the same.  I said that I had never done it before, but the daisy chain would make an adorable necklace for a 7 year old girl.  So I set about to learn how to make a daisy chain.

I have to admit, I don't think I did my daisies exactly "correctly" but I won't tell if you won't tell.  ;)  It just worked out better the way I did it, and I think it looks great.  I finished it up and I had my Sara try it on to see how it would look.  Ooooh, I thought it was super way cute, and I told her to go look in the mirror.  She came back with her shirt up over her chin and said, "What?  I don't have anything!"  lol.  That meant she wanted it.  Of course I told her I would make her one too, and I did.

Here are some pics of the Daisy Chain necklace with lots of multi colored flowers.  Makes me think of a spring time garden.
Once I got it beaded I doubled the thread back through with lots of half hitch knots along the way to reinforce and secure it since it is for a little girl.  They tend to be a little rougher on things.  Cute, isn't it?

I had a very long, but good, day today.  I only got a few hours of sleep, so I was real tired which concerned me.  I was wondering how well I would make it through the day because when I get tired I don't function well at all.  I'm not one who can power through.  Nope.  My brain says, "Overload!" and just shuts down.  Kind of frustrating sometimes.  Sometimes I can only last an hour.  Today, though, I lasted almost 6 hours!!!!!  Holy cow, that is some kind of record for me!  I went to a card making class with my good friend Beth (she sells Close to My Heart scrapbooking supplies).  We made 5 different cards, and they were all beautiful!  The kids were supposed to stay in the bedroom and watch a movie on the DVD player, but the player wouldn't work.  Pretty soon Sara made her way to the table and Beth was very tolerant and gracious and let her join us.  Matthew stayed in the bedroom and played Sara's Nintendo DS and didn't complain one single time through the entire class!!!  Such a good natured kid.  Never causes waves. 

After the class was over and the guests had left it was the kids' turn for some fun.  Beth has a swimming pool and the kids got to go swimming!  They had such a good time and played so well together.  It makes my heart happy to see them get along so well...you can tell they'll be very close throughout their adult years.

So that was my day.  How about you?